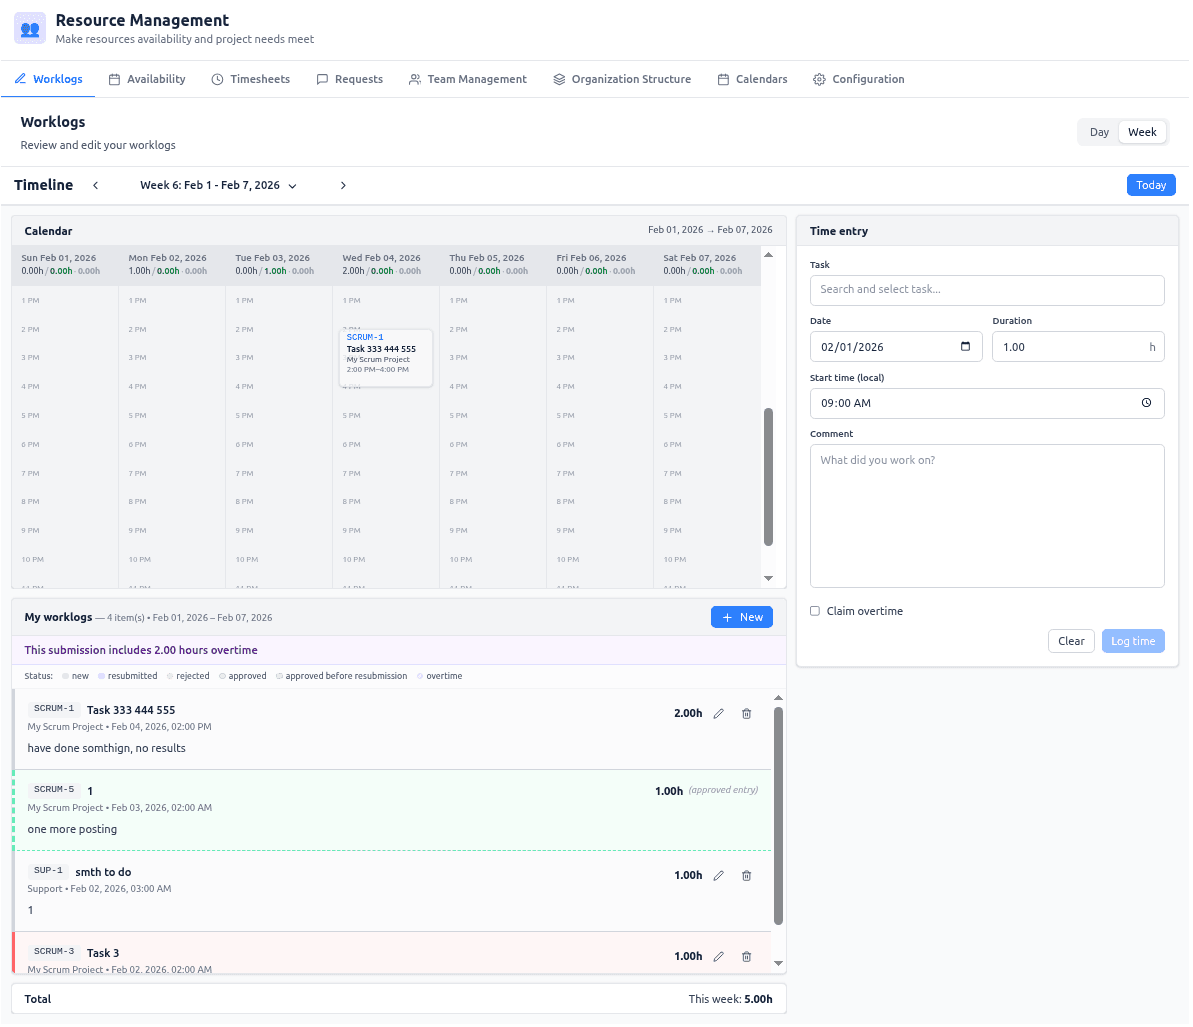
Worklogs
The Worklogs tab is the place to view and manage your own time entries (worklogs). Jira worklog editing becomes a first-class workflow: day and week calendar views, smart start-time presetting, inline issue search, and fast create/update modes. You see your entries on a visual timeline and in a list; you add, edit, or delete them from one form.
- Faster time entry with fewer errors
- Interactive editing of worklogs in a calendar view
- Real-time visibility into total hours logged for the selected period
The worklogs you see and enter here are the same worklogs that users enter on Jira tasks when worklogs are enabled. There is a single source of truth: time logged in this tab (or directly in Jira) is the same data. These worklogs are then used to build accurate timesheets (Team and Project views in the Timesheets tab) and to produce invoices (e.g. via the Download invoice option from Timesheets).
Who can see and do what
| Role | Can open the tab? | What they see and can do |
|---|---|---|
| Instance Admin | ✅ | Own worklogs only. Create, edit, delete own time entries. |
| Resource Management for Jira App Admin | ✅ | Own worklogs only. Create, edit, delete own time entries. |
| Team Manager | ✅ | Own worklogs only. Create, edit, delete own time entries. |
| Project Manager | ✅ | Own worklogs only. Create, edit, delete own time entries. |
| Viewer | ✅ | Own worklogs only. Create, edit, delete own time entries (subject to host platform permissions). |
The Worklogs tab is always “My Worklogs”: every user who has access to the tab sees and manages only their own time entries. Visibility and edit rights for logging time on specific issues follow the host platform (e.g. Jira) permissions.
Interface description
View modes and timeline
- Day view — One day at a time with an hourly timeline. Use it for detailed daily entry and short-range checking.
- Week view — Seven days side by side with an hourly timeline. Use it for weekly entry and totals.
Only day and week are available (no month or quarter) so that the list stays manageable and totals are complete. The timeline shows the current period; you can move to previous/next period and jump to “Today.”
Calendar area
- Day headers and daily work hours — At the top of each day column you see daily work hours: submitted hours, optional overtime (in purple when the day has overtime), approved hours (in green), and available hours. Available hours are computed from your assigned calendar (including corporate holidays and day-of-week patterns) and any approved availability exceptions (e.g. a requested day off or a special working Saturday). Keeping your submitted daily hours close to the available time gives you full control: you can see at a glance whether you are under or over and adjust worklogs before approval.
- Working days and grayed non-working days — The calendar displays working days as per your effective calendar (base calendar + availability exceptions). Non-working days (e.g. weekends, holidays, or days marked as unavailable) are shown with a grayed background on the day column so you can tell them apart from working days. Within each day, the timeline shows the full 24-hour grid; hour slots are clickable for logging time.
- Hour slots — The timeline is divided into hour slots. Worklog cards are placed on the timeline by start time.
- Worklog cards — Each time entry appears as a card. Card height reflects duration. Cards show task key, task name, project name, and time range; a tooltip shows full details. Card color indicates approval status and overtime (when those features are enabled): see Approval status and overtime below.
- Day headers — In week view, each day has a header (date and the daily work hours line above). Headers stay visible when you scroll. In week view you can click a day to select it; the selected day is highlighted and can prefill the date in the time entry form when the form is clear.
- Clicking an empty slot — Fills the form with that date and time and puts you in create mode so you can log new time.
- Clicking a worklog card — Puts you in edit mode: the form is filled with that worklog’s data (task, date, time, duration, comment). You can then update or delete it. If the worklog was approved, saving changes opens a resubmit confirmation (see Resubmit flow).
My Worklogs list
- Contents — All your worklogs in the selected date range. Each item shows task key, task name, project name, date and time, duration, and comment.
- Actions — Click an item to open it in the form for editing. You can use edit and delete actions from the list.
- Totals — The list shows total hours for the selected period.
- New button — Switches to create mode, clears the form, and sets the date (and start time) from the selected day or current anchor. Use it to log a new entry.
- Overtime banner — When the selected period has any worklogs marked as overtime, a banner at the top of the list shows how many hours are overtime (e.g. “This submission includes X hours overtime”).
Time entry form
- Task — In create mode: search and select the issue/task to log time against (inline search, shows task key, project name, task summary). In edit mode: task is read-only.
- Date — Date picker for the work date.
- Duration — Hours (e.g. 0.01–24, two decimal places). Required.
- Start time — Time of day (local) when the work started.
- Comment — Text; required.
- Claim overtime — Optional checkbox (when overtime is enabled). When checked, the entry is stored as overtime for reporting, approvals, and invoice “separate overtimes” export. The worklog then appears with purple styling on the calendar and in My Worklogs (and in the Timesheets approval modal). When unchecked, the entry is regular time. Overtime is not computed from your calendar; it is purely what you mark when logging time.
- Smart start time — When you add a new entry, start time is preset to the end of your last worklog on that day, or 09:00 if there are no worklogs that day. This reduces manual typing.
- Create mode — Button label “Log time.” Submit to create the worklog; after success the form switches to edit mode for that new entry.
- Edit mode — Button label “Update.” Submit to save changes. You can delete the worklog from the list or form.
- Clear — Resets the form and returns to create mode.
Validation: “Log time” or “Update” is disabled until task, duration, and comment are valid.
Approval status and overtime
When worklog approvals are enabled, each worklog has a status (new, resubmitted, approved, or rejected). You see this on the calendar cards and in the My Worklogs list (and in a status legend above the list):
| Status | What you see (calendar and list) |
|---|---|
| New | Card/list row with gray styling (subtle border and background). Not yet submitted for approval. |
| Resubmitted | Blue styling (blue border and background). The worklog was previously approved or rejected and you (or sync) changed it; it is pending approval again. |
| Approved | Green styling (green border and background). A Project Manager (or other approver) has approved this worklog. |
| Rejected | Red styling (red border and background). An approver has rejected this worklog; the list row also shows the rejection reason when provided. You can edit and save again — it will become resubmitted and go back for approval. |
| Previously approved | Emerald/greenish styling with a dashed border. Shown when you moved or edited an approved worklog: the original approved version appears as a “ghost” on its old date/time and still counts toward approved hours; the current version appears as resubmitted (blue) on the new date/time. |
If a worklog has overtime (Claim overtime checked), the same status colors apply but with a purple tint (e.g. purple border/background for new or resubmitted with overtime). The My Worklogs list shows a Status legend (new, resubmitted, rejected, approved, approved before resubmission, overtime) so you can read the colors at a glance.
You do not approve or reject your own worklogs in this tab; approvers do that from the Timesheets tab (worklog approvals modal). Here you only create, edit, delete, and resubmit.
Resubmit flow
When you edit an already approved worklog and click Update, the app shows a “Resubmit Approved Worklog?” dialog. It explains that editing will change the status to resubmitted and the worklog will require new approval. It may show the previously approved hours (and comment) for reference. You can Cancel (no change) or Resubmit (save your changes; status becomes resubmitted and a Project Manager can approve or reject again from Timesheets). After resubmit, the calendar and list show the current entry as resubmitted (blue) and, if the approved date/time or duration changed, a Previously approved (emerald, dashed) for the original approved version so approved hours per day stay correct.
Use cases
Log new time (create a worklog)
- Choose Day or Week view and the correct date/period.
- Either click an empty time slot on the calendar (form gets that date and time) or click New (form gets the selected day and smart start time).
- In the form: search and select the task, set date and start time if needed, enter duration and comment. Optionally check Claim overtime.
- Click Log time. The new worklog appears on the calendar and in My Worklogs; the form stays on that entry so you can edit it if needed.
Edit an existing worklog
- In the calendar or in My Worklogs, click the worklog you want to change.
- The form fills with that worklog’s task, date, time, duration, and comment.
- Change any fields (except task, which is fixed in edit mode), then click Update.
Delete a worklog
- Open the worklog for editing (click it on the calendar or in the list).
- Use the delete action (from the list or form). Confirm if prompted.
Resubmit an approved worklog (when approvals are enabled)
- Click an approved worklog (green) on the calendar or in My Worklogs.
- Change date, time, duration, or comment as needed. Click Update.
- In the “Resubmit Approved Worklog?” dialog, read the note and optionally the previously approved block. Click Resubmit to save; the worklog becomes resubmitted (blue) and will need new approval from the Timesheets tab.
Respond to a rejected worklog
- A rejected worklog (red) shows the rejection reason in the list when the approver provided one.
- Click the worklog, adjust it (e.g. fix comment or duration), and click Update. The status becomes resubmitted (blue) and it goes back for approval; the red styling is removed until the approver decides again.
Use week view and day selection
- Switch to Week view to see seven days at once.
- Click a day header to select that day. The date can prefill the form when you click New or an empty slot.
- Total hours per day appear in the day headers; use them to check your daily totals.
Keep totals complete
If you use a very wide date range, the system may not load all worklogs (there is a limit). A warning appears and totals may be incomplete. Use a shorter range (e.g. one week or one day) to see all worklogs and correct totals.