Timesheets
The Timesheets tab shows worklogs (time entries) posted to projects and compares them to a baseline so you can spot gaps and over-reporting. Timesheets become actionable by comparing actuals to smart baselines:
- Team View: Posted hours are compared to available working time from each resource’s effective calendar (working hours, exceptions, availability).
- Project View: Posted hours are compared to time allocated to the project from approved resource requests and assignments.
Color-coded cells highlight when reported hours are above or below the baseline. That supports immediate detection of over-allocation and under-utilization, better compliance and audit readiness, and executive-ready reporting.

Who can see and do what
| Role | Can open the tab? | What they see |
|---|---|---|
| Instance Admin | ✅ | All timesheets. Team View and Project View. Can approve/reject worklogs when approvals are enabled. |
| Resource Management for Jira App Admin | ✅ | Same as Instance Admin (subject to host platform restrictions). |
| Team Manager | ✅ | Team View only. Timesheets for team members in the teams they manage (team → member → project). Can approve/reject worklogs when approvals are enabled. |
| Project Manager | ✅ | Project View only. Timesheets for projects they manage (project → member). Can approve/reject worklogs when approvals are enabled. |
| Team Manager + Project Manager | ✅ | Both Team View and Project View; each view shows only the data for that role. |
| Viewer | ❌ | — |
Only Instance Admin, Resource Management for Jira App Admin, Team Manager, and Project Manager can open the Timesheets tab. Viewer cannot access Timesheets (tab not available).
Who can approve or reject worklogs is controlled by application settings (when worklog approvals are enabled). Typically Project Managers approve worklogs for their projects; Team Managers may have approval rights for their team members’ work.
Interface description
View switch
- Team View — Groups data by team → member → project. Baseline = available working time from each resource’s effective calendar. Use it to check whether team members are logging time in line with their capacity (over/under relative to their calendar).
- Project View — Groups data by project → member. Baseline = allocated hours from approved resource requests/assignments. Use it to check whether posted hours match what was allocated to the project.
Only the views allowed for your role are shown. If you have both Team Manager and Project Manager roles, you can switch between Team View and Project View.
Timeline
- Scale — Day, week, or month (quarter is not offered for timesheets to keep data and totals manageable).
- Navigation — Previous/next period, “Today,” and date selector. The current period is highlighted.
- Period columns — Each column is one period (e.g. a day, week, or month). Column headers show the period label and sublabel (e.g. date range).
Filters
- Filter by project — (Project View only.) Text search to narrow by project name.
- Filter by resource name — Narrow by person’s name.
- Filter by title/position — Narrow by job title.
- Filter by team/RBS — Narrow by team name or RBS code.
- Reset filters — Clears all filters above.
Filters are applied to the list of teams/projects and members; combine them as needed, then use Reset filters to clear.
Saved filters (Jira saved filters in Timesheets)
The Timesheets filters panel also includes a Saved filter control:
- The Saved filter button opens a dialog that lists Jira saved filters available to the current user (similar to Jira’s own Saved Filters view).
- Selecting a saved filter applies it to Timesheets: only worklogs whose issues match the saved filter’s JQL are shown (on top of the current view, project search, and other filters).
- Very broad Jira filters are rejected for performance/usability: if a saved filter matches more than the allowed issue cap, the app reports “filter too broad, narrow it down” and does not apply that filter.
- The currently applied saved filter is shown inline next to the button and can be cleared with a dedicated “X” action.
The selected saved filter is also reused by the Download invoice dialog in Project view: when you check Apply saved filter there, the invoice export uses the same Jira saved filter to restrict which issues (and therefore worklogs) are included.
Grid (main area)
- Left side — Hierarchy: team and member names (Team View) or project and member names (Project View). Group headers have expand/collapse (chevron); you can collapse a team or project to hide its members. Each row shows total hours for that row across the visible periods.
- Right side — Period columns. Each cell shows hours reported in that period for that row. When a baseline exists:
- Green — Reported hours match the baseline (calendar or allocation).
- Orange/red — Over-reported (more hours than baseline).
- Yellow — Under-reported (fewer hours than baseline).
- Gray — No worklogs for that period.
Color intensity can indicate how large the difference is (e.g. light for small, dark for large). A tooltip on hover shows reported hours, baseline, difference, and percentage.
Submitted vs approved hours (when approvals are enabled)
When worklog approvals are enabled, the grid can show either submitted or approved hours, controlled by a header switch (“Show submitted/approved hours”):
- Submitted — All worklogs that count as “submitted”: status
new,resubmitted, orapproved(i.e. everything except rejected and deleted). This is what the user has put in; rejected entries are excluded from this total. - Approved — Only worklogs that have been explicitly approved. Use this for compliance and billing on “approved” time.
The switch defaults to submitted. When submitted and approved hours differ (e.g. some hours pending approval), the cell displays an asterisk (∗) so you can see at a glance that there is a gap between what was submitted and what is approved.
Overtime (when enabled): If overtime tracking is on, worklogs can carry a “claim overtime” flag. Overtime is included in the submitted/approved totals; how it is shown:
- Timesheet grid (Team and Project view): Each cell shows the total hours; when the period has overtime, the overtime part is shown in round brackets in purple text. Example:
4.50(2.00)means 4.5 h total, 2 h of which are overtime. When the switch is “submitted”, the main number is in black and the bracket in purple; when “approved”, the main number is in green and the bracket in purple. If there is no overtime in that cell, only the total is shown (e.g.4.50). - Worklog approvals modal: In the hours column, each row shows total hours with overtime in round brackets in purple when applicable (e.g.
1.00(1.00)). Rows that have overtime also have a purple left border so you can spot them quickly. The legend at the bottom of the modal explains the overtime indicator.
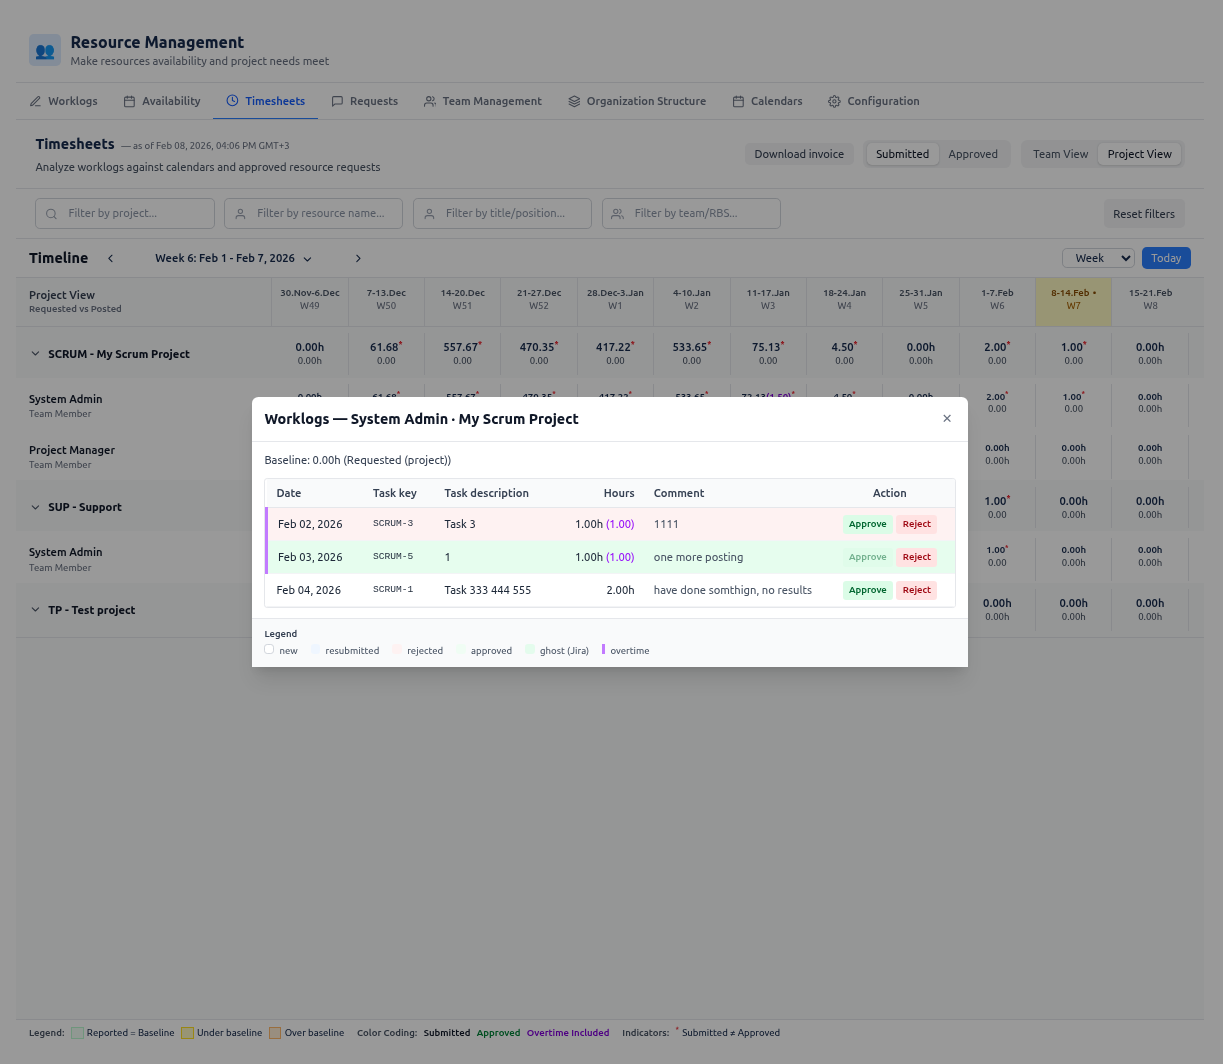
Cell click and worklog approvals modal
Clicking a cell (project × resource × period) opens the worklog approvals modal for that scope. The modal lists all worklogs in that period and, if you have permission, lets you approve or reject each entry.
What the modal shows:
- Table: Date, task key, task description, hours (with overtime in brackets when applicable), comment, and action buttons (Approve / Reject) when approvals are enabled.
- Status styling: Rows are color-coded by status (new, resubmitted, rejected, approved; “ghost” for approved-then-deleted worklogs in Jira).
- Reject flow: Reject opens an inline field for an optional rejection reason and Confirm Reject / Cancel.
- Legend at the bottom explains the status colors and the overtime indicator.
When approvals are disabled (or you have no permission), the modal opens in read-only mode: you see the same list but cannot approve or reject.
Worklog approvals modal (implementation): The modal is implemented by the Worklog Approvals component. It loads worklogs for the clicked cell (resource × project × period), renders a table (date, task key, description, hours with optional overtime in brackets, comment, and Approve/Reject when editable). It supports an optional rejection reason and Confirm Reject; shows status-based row styling (new, resubmitted, rejected, approved, ghost) and a purple border for overtime; displays baseline hours when provided; and shows a legend for status and overtime. Approval/reject actions call the platform adapter and can trigger notifications when enabled.
Download invoice
The Timesheets tab (Project view) gives access to the Download invoice button in the header. It opens a dialog to export invoice-ready actuals for one project and a date range — format (XLSX/CSV), aggregation (day/week/month), submitted or approved hours, and optional worklog details, effective rates/costs, and overtime.
Invoice export scope is defined by the selected project and From/To dates; Timesheets grid filters (resource name, title, team) are not applied. On Jira, when Apply saved filter is checked in the dialog, the export is additionally restricted to issues from the currently selected Jira saved filter. For the full overview, see Invoice generator (Download invoice).
Collapse and expand
- Use the chevrons on team or project headers to collapse or expand sections. Collapsed sections hide member rows; expand again to see them. Collapse state is kept while you stay on the tab but can reset when filters change.
Use cases
Team Manager: check team members’ hours vs capacity (Team View)
- Open the Timesheets tab and select Team View.
- Set the timeline to the desired scale (day/week/month) and date range.
- Optionally use filters (resource name, title, team/RBS) to focus on specific people or teams.
- Review the grid: green = hours match available working time; yellow = under-reported; orange/red = over-reported. Use tooltips for exact numbers and baseline.
- Expand or collapse teams to focus on one team or compare several.
Project Manager: check project hours vs allocations (Project View)
- Open the Timesheets tab and select Project View.
- Set the timeline and date range.
- Optionally use Filter by project and other filters to narrow the list.
- Review the grid: baseline is allocated hours from approved resource requests. Green = posted matches allocation; yellow = under; orange/red = over. Use tooltips for details.
- Use this to see fulfillment and gaps per project and per resource.
Approve or reject worklogs (when approvals are enabled)
- In Team View or Project View, click a cell (project × resource × period) that shows worklogs you can approve.
- The approval modal opens with the list of worklogs in that period.
- For each entry you can Approve or Reject (if your role has permission). Approved/rejected state is then reflected in the grid and in the “submitted vs approved” switch.
Compare submitted vs approved hours
- When approvals are enabled, use the header switch to show submitted hours (all submitted work) or approved hours (only approved work).
- When submitted and approved hours differ (e.g. some hours pending approval), the timesheets view displays an asterisk (∗) on the cell to notify you. Use this for compliance and to see what is still pending approval.
Export for invoicing
- Click Download invoice (or equivalent) in the header.
- In the dialog, choose the period, options (e.g. separate overtimes/weekend, include rates and cost), and format, then generate the export.