Team Management
The Team Management tab is a tool where team managers can manage their teams. Team managers see and work only with members of the teams they manage; they use the filters to find people and open the settings modals to configure each resource’s default calendar, calendar overrides, rate periods, and availability.
The data you enter here is used for accurate resource commitment and capacity calculations in resource requests and timesheets — so plans, allocations, and baseline comparisons stay realistic.
Who can view and edit
| Role | Can open the tab? | Can edit? |
|---|---|---|
| Instance Admin | ✅ | ✅ All resources |
| Resource Management for Jira App Admin (delegated admin) | ✅ | ✅ All resources |
| Team Manager | ✅ | ✅ Only members in teams they manage |
| Project Manager | ❌ | — |
| Viewer | ❌ | — |
Team managers see only resources that belong to their managed teams. Admins see and can edit all resources.
Filters and what they do
A filter bar sits below the header. Use it to narrow the list of team members so you can find the right people before opening a modal.
- Filter by resource name — Type part of a person’s name. The table shows only members whose name matches (e.g. “John” or “Smith”). Useful when you know who you’re looking for.
- Filter by title/position — Type part of a job title. The table shows only members whose title contains that text (e.g. “Developer”, “QA”). Useful to work with a role across the team.
- Filter by team/RBS — Type a team name or RBS code. The table shows only members who belong to teams matching that text. Useful to focus on one team or branch of the structure.
- Reset filters — Clears all three filters and shows the full list again (within your role’s scope).
Filters work together: if you set name and team, only members matching both appear. Combine them as needed, then use Reset filters to start over.
Setting the default calendar
Each team member has a default working calendar (e.g. “UK Office”, “Part-time”). It defines their usual working hours and holidays when no override is set.
- In the table, find the member’s row and use the Default Calendar dropdown in that row.
- Choose the calendar from the list and the change applies immediately.
The default calendar is used for capacity and timesheet baselines unless you add a calendar override for a specific period (see below).
Period management: shared modal and calendar
The three actions — Manage Rates, Manage Calendar, Manage Availability — each open the same Period Settings modal in a different mode (Rates, Calendar, or Availability). In every mode:
- Left: List of periods (or, in Availability, periods plus request cards). The list is filtered by the visible calendar date range (e.g. the current month). Change the visible month or range to load and show other periods.
- Right: A calendar widget (“Select Dates”) used to pick dates and to visualise working days and periods. The widget does not create or save data; it shows the resource’s working/non-working pattern and the periods you are editing.
- Footer: Cancel (close without saving) and Save Changes (persist the full list). Save is disabled when there are validation errors or while saving. In Availability mode you also see request cards (from the resource’s Availability self-service requests); those are approve/reject only — you cannot edit request content.
Calendar widget behaviour by mode:
- Manage Calendar: The calendar background shows working days and calendar exceptions from the resource’s default (base) calendar only. The foreground shows the calendar override periods you are adding or editing (date range + chosen calendar). So you see base schedule and override ranges together.
- Manage Rates and Manage Availability: The background shows the effective calendar for each date (default calendar plus any calendar overrides that cover that date — e.g. inside a business-trip range, the override calendar’s pattern is shown). The foreground shows the rate periods or availability periods you are editing. So you see the real working pattern and your periods in one view.
Data loading and saving are done inside the modal via the platform adapter; the parent (Team Management) does not fetch or save periods itself.
Calendar overrides (e.g. business trips)
Sometimes a resource works in a different location or schedule for a period (business trip, secondment, temporary part-time). You can assign a different calendar for that period without changing their default.
- Find the member in the table (use filters if needed).
- Click Manage Calendar for that row. The Period Settings modal opens in Calendar mode.
- In the modal, add calendar override periods: each period has start date, end date (inclusive), and calendar to use for that range. You can add several periods (e.g. one trip in March, another in June). Optionally, “Include specific times” (if supported) lets you restrict the override to certain time slots within each day.
- The calendar widget shows the resource’s base calendar (working/non-working and exceptions) as background and your override periods as foreground. Use it to pick dates and check ranges.
- Click Save Changes. For dates inside an override range the system uses that calendar for capacity and timesheets; outside those dates it uses the default calendar.
Rate periods (for invoicing)
Rates (e.g. standard, overtime, weekend) can vary over time (contract change, promotion). You define rate periods with start and end dates so the system uses the right rates for the right period — including for calculating costs or invoices.
- Find the member in the table.
- Click Manage Rates for that row. The Period Settings modal opens in Rates mode.
- In the modal, add or edit rate periods: set start and end dates (inclusive) and the rate values (e.g. standard, overtime, weekend) for that period. You can have multiple periods (e.g. different rates from a given date).
- The calendar widget shows the resource’s effective calendar (default + overrides) per date as background and your rate periods as foreground. The list is filtered to the visible calendar date range — change the month to see other periods.
- Click Save Changes. Rate periods are used when the application values work (e.g. invoicing, cost roll-ups) in the given date range.
Managing individual resource availability
Availability defines when a resource is actually available to work (e.g. time off, leave, or working time on non-working days). This drives capacity in resource requests and the timesheet baseline (“available working time” in the Team view).
- Find the member in the table.
- Click Manage Availability for that row. The Period Settings modal opens in Availability mode (team mode).
- In the modal you see a combined list: approved availability periods (editable by you) and request cards (from the resource’s Availability self-service requests). You can:
- Add, edit, or remove approved periods: set start/end dates and period type — Unavailable (e.g. time off) or Available (working time on a non-working day). For Available periods you can optionally set “Include specific times” (working time slots, e.g. 10:00–14:00) so only those hours count as available.
- Approve or Reject request cards (only for status Requested). Reject shows an inline rejection reason field and Confirm reject; the resource sees the reason in the Availability self-service tab. Request cards are read-only (you cannot edit the requested period content).
- Overlap rule: No two approved periods (or approved + a Requested set_exception) may overlap (inclusive “touching” rule). The modal validates on save. If the resource has a pending cancellation request for an approved period, approving a new set_exception request over the same dates is re-validated at approval time (you must approve the cancellation first if overlap would occur).
- The calendar widget shows the resource’s effective calendar per date as background and availability periods (and request ranges) as foreground. The list is filtered to the visible calendar date range.
- Click Save Changes to persist the approved periods list. Approved requests become periods; rejected requests remain in the list with status and reason visible to the resource.
How this data is used
The data you enter in Team Management — default calendar, calendar overrides, rate periods, and availability — is used across the application for accurate planning and reporting:
- Resource requests: Capacity and remaining availability are calculated from calendars and availability. Allocations and overloads are based on this so plans stay realistic.
- Timesheets: The Team view compares posted hours to available working time from the effective calendar and availability. The Project view compares posted hours to allocated hours from approved resource requests. So variance (over/under) is meaningful.
Keeping default calendars, overrides, rates, and availability up to date in this tab ensures that resource commitment and capacity calculations in resource requests and timesheets are accurate.
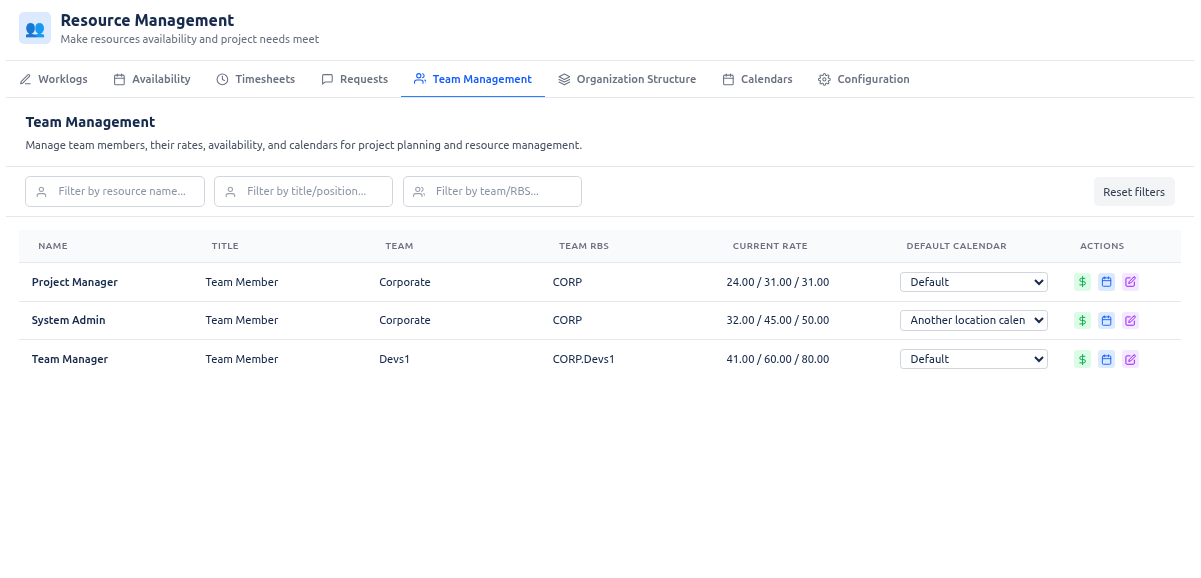
Controls and layout summary
- Header: “Team Management” with subtitle describing the tab.
- Filters: Resource name, title/position, team/RBS, and Reset filters (see above).
- Table: One row per team member — Name, Title, Team, Team RBS, Current Rate, Default Calendar (dropdown), and three action buttons: Manage Rates, Manage Calendar, Manage Availability. Each button opens the same Period Settings modal in the corresponding mode (Rates, Calendar, or Availability). The modal has a calendar widget (right) for date selection and visualisation and a list of periods (left) filtered by the visible calendar date range; change the visible month or range to load other periods. Footer: Cancel and Save Changes.