Calendar management
This section describes the Calendar Management feature: what it is for, how it works, who can use it, and how to use the interface.
What this feature is for and how it works
Calendars define working time that drives capacity and utilization across the app. Traditional tools assume uniform working hours and ignore real-world patterns (part‑time schedules, holidays, sabbaticals, role changes). The application uses a multi‑calendar engine so that:
- True capacity is calculated from effective periods, exceptions, and working hours — so plans stay realistic.
- You get fewer scheduling conflicts caused by bad capacity assumptions.
- Utilization and timesheets use accurate baselines (e.g. available working time from the effective calendar).
- Forecasting across day, week, month, and quarter is based on real calendars, not a single template.
Each calendar has:
- Regular working hours — Which weekdays are working days and which time slots (e.g. 09:00–17:00) apply. You can define multiple slots per day (e.g. split shifts).
- Exception days — Date-specific overrides: holidays or other non‑working days (no hours), or special working days (e.g. a Saturday with custom hours).
Calendars are assigned to resources (and optionally to projects) with effective periods. The app then uses the effective calendar for a given date to compute available capacity, non‑working days (e.g. for weekend rates), and baselines in timesheets. Calendar management is where you create and maintain these calendar definitions.
Calendars let you set exact working hours for each working day and leave non‑working days without hours. This data is used for accurate time estimation when using resource requests: requested and allocated hours are based on the same calendar rules, so capacity and fulfillment stay consistent.
The application supports an unlimited number of calendars. That is important for organizations running business in multiple locations: you can define one calendar per location (e.g. different time zones or local holidays) and assign the right calendar to each resource or period.
Pre-defined calendars can also be used to manage calendar exceptions for team members accurately. For example, during business trips where working times differ from the home location, you can assign a different calendar (or an exception period) so capacity and timesheets reflect the actual working hours for that period.
Who can access this tab
| Role | Can open the tab? | What they can do |
|---|---|---|
| Instance Admin | ✅ | View, create, edit, and archive calendars. |
| Resource Management for Jira App Admin | ✅ | View, create, edit, and archive calendars. |
| Team Manager | ✅ | View only (read-only). Create/edit/archive controls are disabled or hidden. |
| Project Manager | ✅ | View only (read-only). Create/edit/archive controls are disabled or hidden. |
| Viewer | ✅ | View only (read-only). Create/edit/archive controls are disabled or hidden. |
Only Instance Admin and Resource Management for Jira App Admin can create, edit, or archive calendars. Team Managers, Project Managers, and Viewers see the same interface in read-only form.
User interface overview
The Calendar Management screen has a header, a left sidebar (calendar list), and a main content area (selected calendar’s working hours and exceptions).
Header
- Title: “Calendar Management”
- Subtitle: “View and manage calendars for various locations, set working time and exceptions”
- Controls (visible or enabled only for admins/delegated admins):
- Show Archived / Hide Archived — Toggle whether archived calendars appear in the list. Default is to hide archived.
- Save — Saves the current calendar (visible only when in edit mode).
- Edit — Switches the selected calendar into edit mode so you can change working hours and exceptions. Disabled for non‑admins.
- Archive / Unarchive — Archives the selected calendar (or restores it from archived). Disabled for non‑admins and for the default calendar (the default calendar cannot be archived).
Left sidebar: Calendars list
- Heading: “Calendars”
- List of calendars — Each item shows the calendar name and, if applicable, badges for Default and Archived. Clicking a row selects that calendar and loads it in the main area. The selected calendar is highlighted. Archived calendars are shown with reduced opacity when “Show Archived” is on.
- Unarchive (per archived item) — For archived calendars, a small refresh-style button on the row restores that calendar without selecting it first.
- Add Calendar (admins only) — Button that expands a create section:
- New calendar name — Text field (e.g. “New calendar name”).
- Create Calendar — Creates the calendar and selects it; you are then in edit mode for the new calendar.
If no calendar exists and the user has create permission, the main area can show a single call-to-action: Create a calendar (e.g. “Default Calendar” as initial name).
Main content: Selected calendar
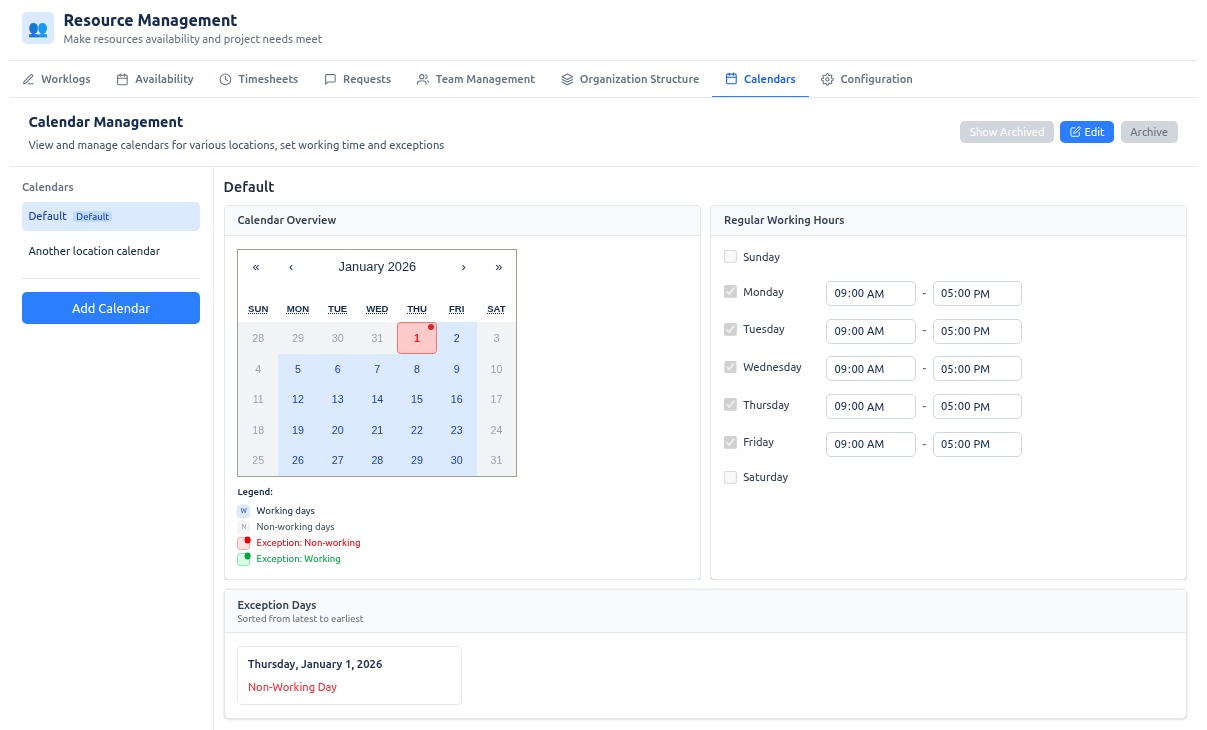
When a calendar is selected, the main area shows its name and three blocks: Calendar Overview, Regular Working Hours, and Exception Days.
1. Calendar Overview (month view)
- Heading: “Calendar Overview”
- Month calendar — A standard month view. Tiles are styled by type:
- Working days — Days that have regular working hours (e.g. blue “W”).
- Non‑working days — Weekdays with no working hours (e.g. gray “N”).
- Exception: Non‑working — Date has an exception with no hours (e.g. red indicator).
- Exception: Working — Date has an exception with working hours (e.g. green indicator).
- Clicking a date — Selects that date for adding or editing an exception (see Exception Days).
- Legend — Explains the four tile types: Working days, Non‑working days, Exception: Non‑working, Exception: Working.
2. Regular Working Hours
- Heading: “Regular Working Hours”
- Rows — One per weekday (order follows locale week start, e.g. Monday–Sunday).
- Per day:
- Checkbox — When checked, the day is a working day; when unchecked, it is non‑working (no slots).
- Day name — Label for the row (e.g. Monday, Tuesday).
- Time slots — If the day is working, one or more start – finish time inputs (e.g. 09:00–17:00). You can:
- Change start/finish times (only in edit mode).
- Remove a slot (X button, edit mode only).
- Add Time Slot (edit mode only) — Adds another slot for that day (e.g. 09:00–17:00). Useful for split shifts.
Only admins/delegated admins can toggle days or change slots; others see the same layout in read-only form.
3. Exception Days
- Heading: “Exception Days” with note “Sorted from latest to earliest”
- Add exception (edit mode only) — Button that lets you pick a date (via the month calendar or current date) and then define an exception for it.
- New exception (when a date is selected) — A small panel shows the chosen date (e.g. “Friday, January 15, 2026”) and two actions:
- Mark as Non‑Working Day — Adds/updates an exception with no working hours (holiday, day off).
- Add Working Hours — Adds/updates an exception with one or more time slots (e.g. special Saturday). You can clear the selected date (X) to cancel.
- List of existing exceptions — Shown as cards in a grid (e.g. four columns). Each card:
- Date — Full date (e.g. “Friday, January 15, 2026”).
- Delete — Removes this exception (edit mode only).
- Content:
- If the exception has no working hours: label “Non‑Working Day” (e.g. in red).
- If the exception has working hours: one or more start–finish time inputs, Add Time Slot, and per-slot remove (X). Same behavior as regular working hours but for that single date.
Exceptions are stored per date; each date is either non‑working or has one or more working slots. The calendar overview and capacity/timesheet logic use these exceptions together with the regular working hours.
How to create and edit a calendar
Creating a calendar
- Open the Calendars tab and, in the left sidebar, click Add Calendar.
- Enter a name in the New calendar name field (e.g. “Berlin Office”, “US East”).
- Click Create Calendar. The new calendar is created and selected; you are in edit mode.
- Set Regular Working Hours (see below) and add Exception Days if needed.
- Click Save in the header to persist changes.
If no calendars exist yet, the main area shows Create a calendar; use it to create the first calendar (e.g. “Default Calendar”).
Editing a calendar
- In the left sidebar, click the calendar you want to edit.
- In the header, click Edit. The main area switches to edit mode (working hours and exceptions become editable).
- Change Regular Working Hours and/or Exception Days as needed.
- Click Save in the header to persist. Click Edit again or select another calendar to leave edit mode without saving more changes.
You can Archive (or Unarchive) a calendar from the header when it is selected; the default calendar cannot be archived. Use Show Archived / Hide Archived to include or hide archived calendars in the list.
Regular working hours
- For each weekday (Monday–Sunday, in locale order), use the checkbox to mark the day as working or non‑working.
- For each working day, set one or more start–finish time slots (e.g. 09:00–17:00). Use Add Time Slot on that row for split shifts (e.g. 09:00–12:00 and 14:00–18:00). Use the X next to a slot to remove it.
- Non‑working days have no slots; the regular calendar then has zero hours for those days. Save after changes.
Adding and editing exceptions
Exception days override the regular working hours for specific dates (e.g. holidays, office closures, or special working days).
- Ensure you are in edit mode (click Edit for the selected calendar).
- In the Exception Days section, click Add exception. The Calendar Overview month view is used to pick a date: click a date in the calendar, or the button may set the current date.
- When a date is selected, a panel appears with that date and two choices:
- Mark as Non‑Working Day — Adds an exception with no working hours (holiday, day off, closure). The date is then shown as “Exception: Non‑working” in the overview and in the exception list as “Non‑Working Day”.
- Add Working Hours — Adds an exception with working hours (e.g. a Saturday with 10:00–14:00). You can add more slots with Add Time Slot and edit start/finish times; use X to remove a slot. The date is shown as “Exception: Working” in the overview.
- The new exception appears in the Exception Days list (cards sorted from latest to earliest). To edit an existing exception: change the time slots in the card, or add/remove slots with Add Time Slot and X. To remove the exception, use Delete (trash icon) on the card.
- To add another exception, click Add exception again and pick another date. Click the X next to the selected date in the panel to cancel adding that exception.
- Click Save in the header to persist all exception changes.
Types of exceptions
| Type | Meaning | Typical use |
|---|---|---|
| Non‑working day | That date has zero working hours (overrides regular schedule). | Public holidays, company holidays, office closures, individual days off. |
| Working day with custom hours | That date has one or more start–finish slots (overrides regular schedule for that date only). | Special working Saturdays, half-days, business trips with different local hours, one-off shift changes. |
Together, regular working hours and exception days define the exact working time for every date; resource requests and timesheets use this for accurate estimation and baselines.
Summary
| Aspect | Description |
|---|---|
| Purpose | Define working calendars (regular hours + exception days) so capacity, utilization, and timesheets use realistic working time. |
| Access | All roles can view; only admins and delegated admins can create, edit, or archive calendars. |
| Main areas | Header (title, Show Archived, Save, Edit, Archive); sidebar (calendar list, Add Calendar); main (Calendar Overview, Regular Working Hours, Exception Days). |
| Default calendar | Cannot be archived; all other calendars can be archived or unarchived by admins. |