Availability self-service
The Availability self-service tab is the place to request time off or working time on non-working days. You see your approved availability periods (read-only) and your requests (Requested, Approved, Rejected, Cancelled). You create new requests and submit them for approval; your line manager (or admin) approves or rejects them from Team Management → Manage Availability. Only approved periods affect your capacity and timesheet baseline.
This tab uses the same Period Settings component as Team Management’s “Manage Availability”, but in user mode: you only create and edit request cards (submit, cancel own requests). Approved period cards are read-only; you can request cancellation of an approved period.
The Availability self-service feature can be enabled or disabled in application settings (Administration and configuration). When disabled, the Availability self-service tab is hidden from the app.
Who can see and do what
| Role | Can open the tab? | What they see and can do |
|---|---|---|
| Instance Admin | ✅ | Own availability only. View approved periods (read-only); create and submit requests; cancel own requests; request cancellation of approved periods. |
| Resource Management for Jira App Admin | ✅ | Same as Instance Admin (own availability only). |
| Team Manager | ✅ | Own availability only. Same self-service actions as above. (To approve/reject others’ requests, use Team Management → Manage Availability.) |
| Project Manager | ✅ | Own availability only. Same self-service actions as above. |
| Viewer | ✅ | Own availability only. Same self-service actions as above (subject to host platform permissions). |
When the Availability self-service tab is enabled in admin settings, all roles can open it. Everyone sees and manages only their own availability (approved periods and requests). Approve/reject is done by managers from the Team Management tab (Manage Availability for a selected resource).
Interface description
Header
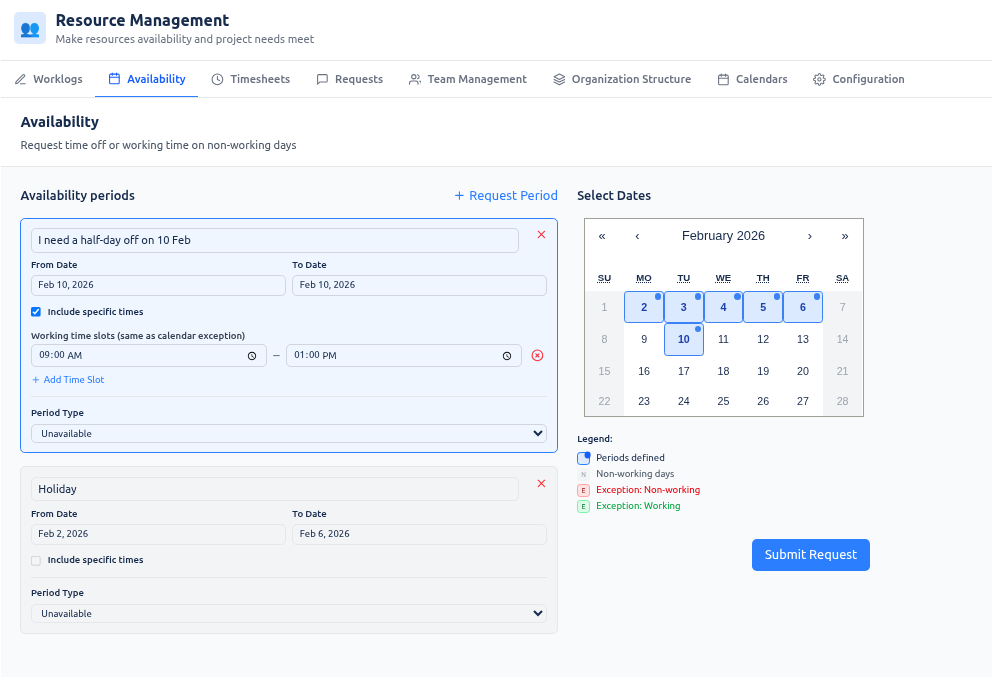
- Title: “Availability”
- Subtitle: “Request time off or working time on non-working days”
Main area: Period Settings (user mode)
The main area is the Period Settings panel. It shows:
- Calendar (right) — A month calendar used to select dates and to filter the list by visible date range. The calendar shows working days and calendar exceptions from your effective calendar (your default calendar plus any calendar override periods). Tiles indicate working days, non-working days, and exception days (non-working or working). This helps you pick dates for a new request and see which days are already working/non-working. The list of periods and requests is filtered to the visible calendar date range (e.g. the current month); change the visible month to load other periods.
- List (left) — A combined list of:
- Approved availability periods (read-only cards)
- Requests (request cards with status: Requested, Rejected, Cancelled, or — once approved — the request is removed and the period appears as approved)
List items are sorted by start date (then end date). Newly created drafts appear at the top (pinned) until you navigate the calendar or close the view.
Approved period cards (read-only)
- Content: Description, start/end dates, period type (Unavailable or Available), and optionally working time slots (for “Available” exceptions, e.g. a Saturday with 10:00–14:00).
- Actions: You cannot edit or delete approved periods directly. The only action is Request Cancellation (e.g. X button), which creates a cancel_exception request. Only one pending cancellation request per period is allowed. Approved periods that have a pending cancellation request are shown with a light-red background (pending cancellation). When the manager approves the cancellation, the period is removed and the request is removed from the list.
Request cards
- Content: Same as a period (description, dates, type, optional working hours). Status badge: Requested, Rejected, Cancelled, or (after approval) the card is removed and the period appears in the approved list.
- Rejection reason: When a request is Rejected, the manager can provide a reason; it is shown on the card.
- Actions: Cancel Request (e.g. X). Cancelling removes the request from the server (whether it was pending or already rejected). After cancel, the list is refetched so the request disappears.
Drafts and Submit Request
- Request Period / Add: Create a draft (new period not yet submitted). Set description, start/end dates, period type (Unavailable = time off; Available = working time on a non-working day), and optionally working time slots for Available (e.g. “Include specific times” with start–finish slots).
- Submit Request: Submits all current drafts as set_exception requests. Each draft becomes a request card with status Requested. The button is disabled when there are no drafts or when validation fails.
- Validation: New or edited drafts must not overlap existing approved periods or other Requested requests. Exception (cancel + replace): An approved period that has a pending cancellation request is excluded from the overlap check, so you can submit a new request over the same dates while the cancellation is still pending.
Overlap rule
No two approved periods or Requested set_exception requests may overlap (inclusive “touching” rule). Approved periods with a pending cancellation request are excluded from this check so you can “cancel + replace” in one go.
Use cases
Request time off (unavailable)
- Open the Availability self-service tab.
- Use Request Period (or equivalent) to add a draft. Set period type to Unavailable. Enter description (e.g. “Annual leave”), start and end dates. Optionally narrow to specific times if the UI supports it.
- Ensure the draft does not overlap existing approved periods or other Requested requests (the UI validates). Click Submit Request. The new request appears with status Requested. Your manager can approve or reject from Team Management → Manage Availability.
Request working time on a non-working day (available exception)
- Open the Availability self-service tab.
- Add a draft. Set period type to Available. Enter description, start and end dates. If the UI supports working time slots (“Include specific times”), add one or more start–finish slots (e.g. 10:00–14:00 for a Saturday).
- Submit with Submit Request. The request goes to your manager for approval.
Cancel a request
- In the list, find the request card (Requested or Rejected).
- Click Cancel Request (e.g. X). The request is removed from the server and disappears from the list.
Request cancellation of an approved period
- In the list, find the approved period you want to cancel (e.g. an old time-off block).
- Click Request Cancellation (e.g. X on that card). A cancel_exception request is created. The approved period is shown with light-red background (pending cancellation). Only one pending cancellation per period is allowed.
- Your manager approves or rejects the cancellation from Team Management → Manage Availability. If approved, the period is removed and the cancellation request is removed from the list.
Cancel + replace (submit new request over same dates while cancellation is pending)
- You have an approved period and you have already submitted a Request Cancellation (so it shows pending cancellation, light-red).
- Add a new draft that overlaps the same dates (e.g. change of dates or type). The overlap check excludes that approved period because it has a pending cancellation, so the draft is valid.
- Click Submit Request. The new request is created. When the manager approves the cancellation, the old period is removed; when they approve the new request, the new period is added.
Summary
| Aspect | Description |
|---|---|
| Purpose | Self-service requests for time off (unavailable) or working time on non-working days (available exception), with manager approval. |
| Access | All roles can open the tab (when enabled in admin settings); everyone sees only their own availability and requests. |
| Approval | Team Managers (or admins) approve/reject from Team Management → Manage Availability; not from this tab. |
| Admin setting | The Availability self-service tab can be enabled or disabled in application settings (see Administration and configuration). |