Resource Requests
The Resource Requests tab is a stateful request engine that connects Project Managers and Team Managers. It provides a structured workflow for staffing cross-functional project teams in a way that scales to many parallel projects and many resource-supplying teams.
At a high level, the flow is:
- Project Manager creates a request (what is needed, when, and why)
- Project Manager submits it to a target team
- Team Manager reviews demand vs team capacity, proposes assignments
- Team Manager sends it back for PM review
- Project Manager accepts (or rejects), and the assignment becomes the baseline for tracking actuals
Who can see the tab and what they see
| Role | Can open the tab? | What they see |
|---|---|---|
| Instance Admin | ✅ | All requests. Can perform any action. |
| Resource Management for Jira App Admin (delegated admin) | ✅ | Same as Instance Admin. |
| Team Manager | ✅ | Only requests assigned to teams they manage. Can assign resources, send for review, and reject. |
| Project Manager | ✅ | Only requests for projects they manage. Team capacity section is hidden (PM does not manage resources). Can create, submit, accept, edit, close, and cancel. |
| Viewer | ❌ | — |
If a user is both Team Manager and Project Manager, they see the union of requests (assigned to their teams or belonging to their projects) and can use the actions allowed for each role on each request.
Layout and controls
View switch
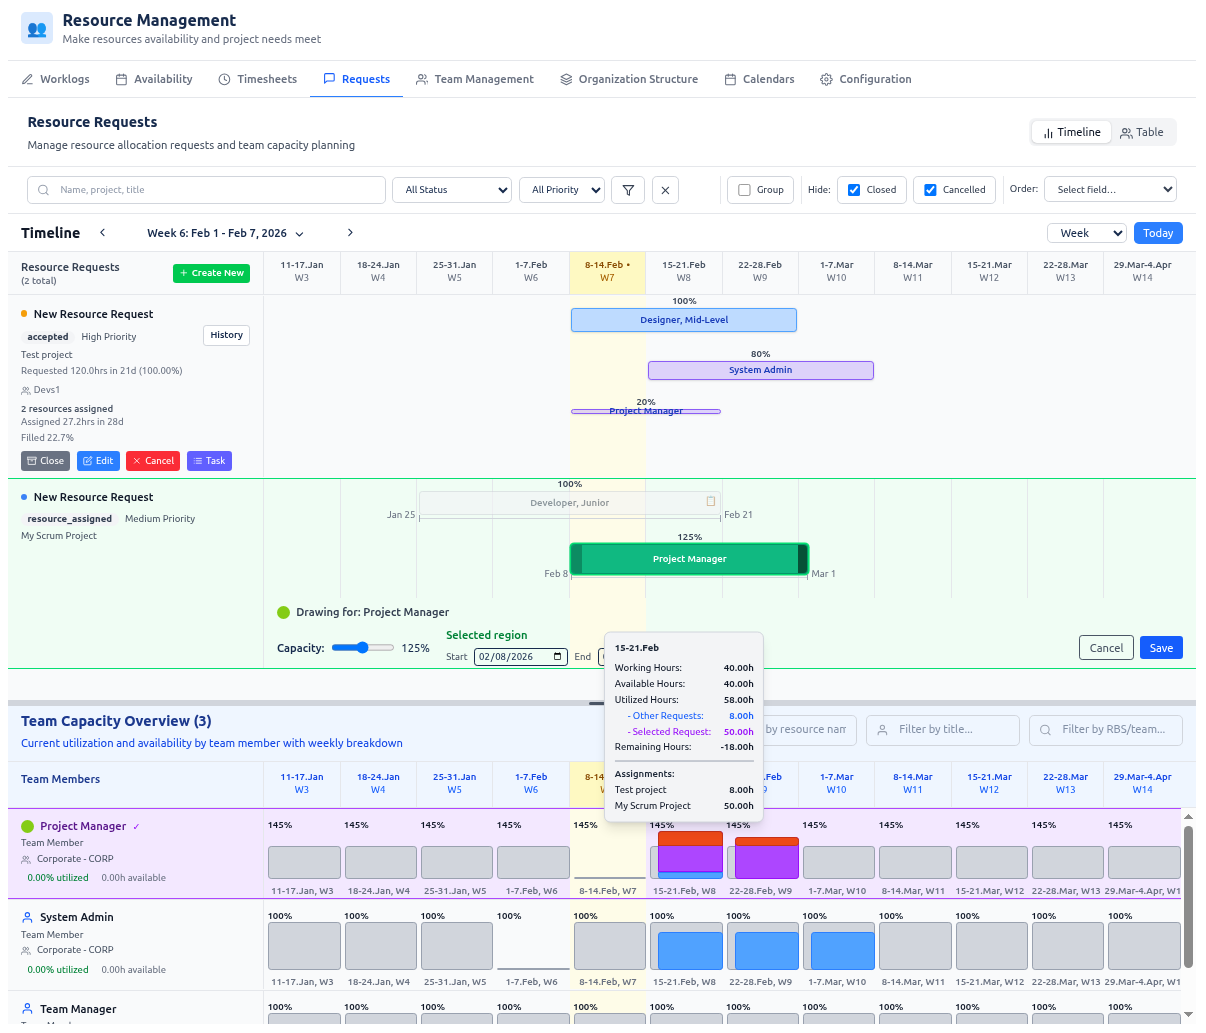
- Timeline — Gantt-style view: requests as bars on a time axis. You can draw capacity regions, assign resources with allocation percentages, and see resource load and overloads. Scale can be day, week, month, or quarter.
- Table — List of requests with columns (e.g. title, project, team, status, priority). Sorting and grouping available. This mode is ideal if you prefer a table workflow and don’t want to use the visual timeline editor/drawer.
Filter bar
Use the filter bar to narrow the list of requests:
- Search — Text search by request name, project name, or title. Type to filter; clear with the × next to the field.
- Status — Dropdown: show only requests in a given status (e.g. submitted, review) or “All Status”.
- Priority — Dropdown: filter by priority (e.g. High, Medium, Low) or “All Priority”.
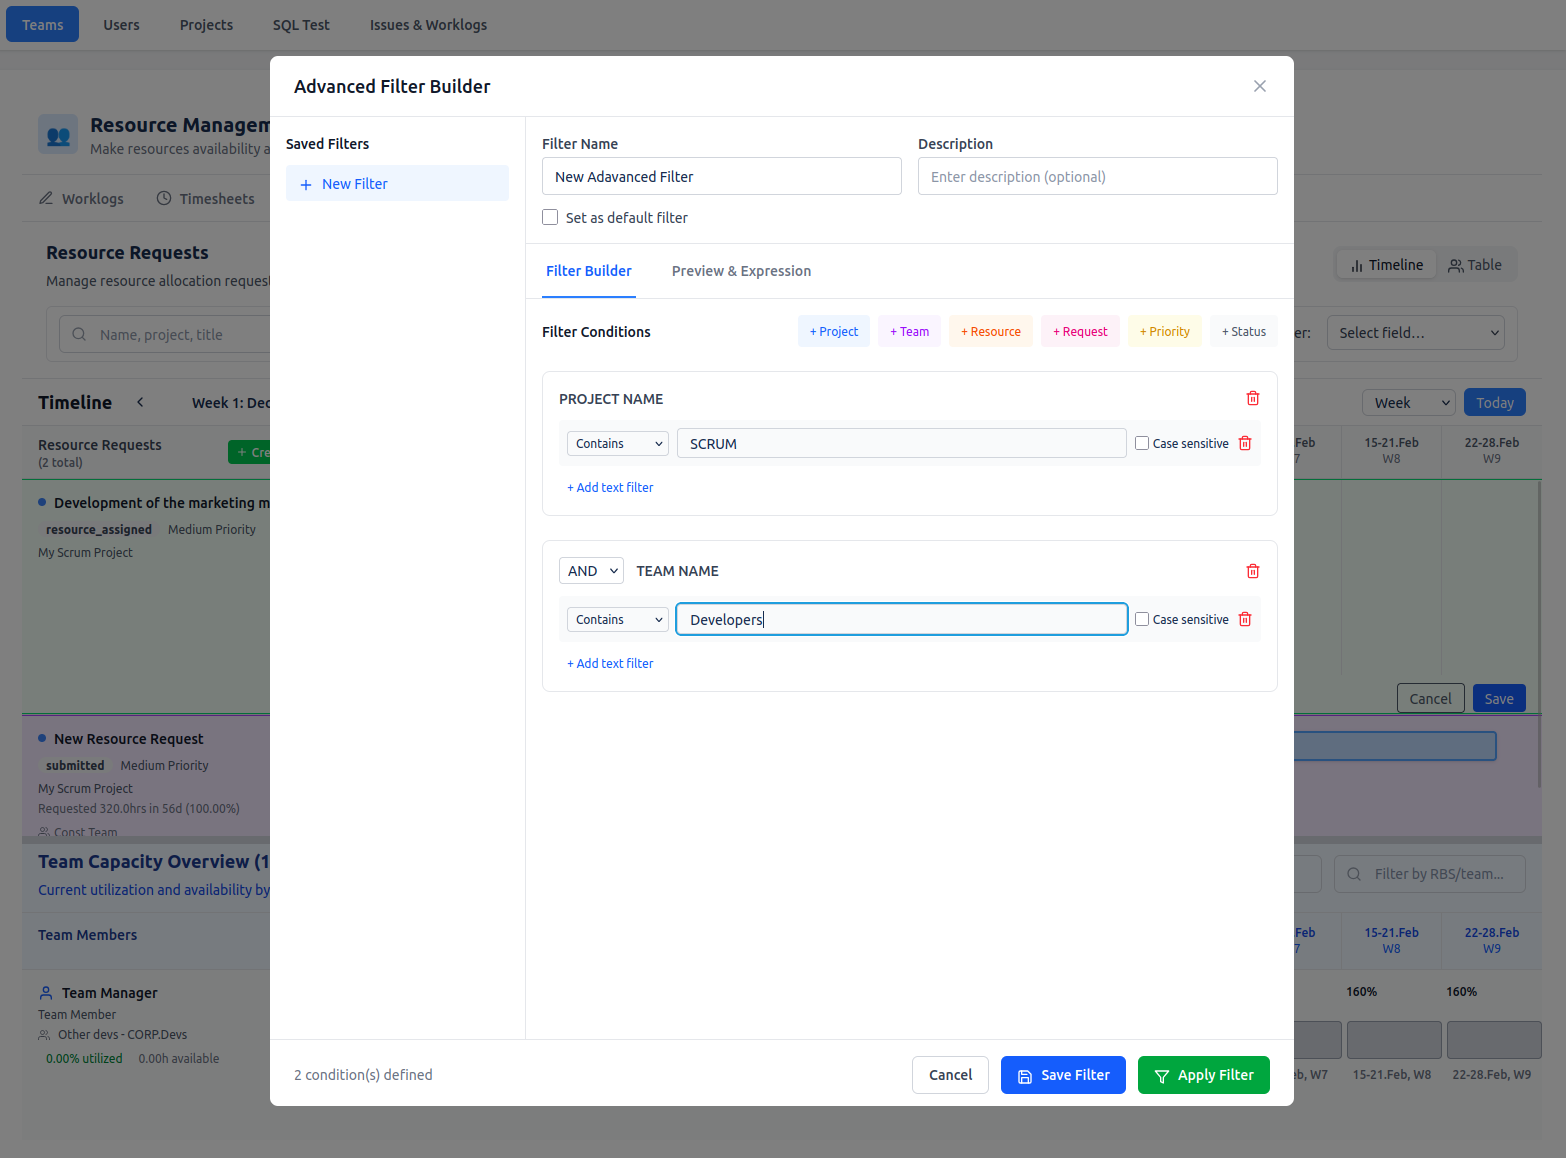
- Advanced filter — Opens a modal where you can build conditions (e.g. by project, team, resource, status) with AND/OR logic and pattern matching. When active, the button shows “Active” and a summary; you can clear the advanced filter from the button or inside the modal.
- Group — Checkbox to group requests by project (when supported).
- Hide: Closed — Checkbox. When checked, closed requests are hidden (default: hidden).
- Hide: Cancelled — Checkbox. When checked, cancelled requests are hidden (default: hidden).
- Clear all filters — Button (shown when any filter is applied) that resets search, status, priority, advanced filter, and “Hide Closed” / “Hide Cancelled” to defaults.
You can also set ordering (sort) by one or more columns; the exact controls depend on the view.
Timeline view (main area)
- Requests — Each request appears as a bar on the timeline. You can select a request to see its details and action buttons. For requests in new or edited status you can open an interactive editor (drawer) to adjust the timeline bar and capacity.
- Team capacity — Below (or beside) the requests area you see team/resource capacity. This shows effective and remaining capacity so you can avoid overloads when assigning.
- Actions — Per request: buttons such as Submit, Assign, Send for Review, Accept, Reject, Edit, Close, Cancel, and History. The buttons shown depend on the request’s status and your role for that request (see Request statuses and who can do what).
Team capacity section (how it fits, what it shows, and how to use it)
The Team capacity section is integrated directly into the Requests screen (in Timeline mode) and is intended primarily for Team Managers. It helps you answer one question quickly:
“Can my team realistically take this work in this period, and if not — what needs to change?”
Where it is
- It appears under the Requests timeline (separated by a splitter) so you can review requests and capacity impact side by side.
What it displays
- One row per team member (scoped to the teams you manage).
- Capacity per time period (same timeline scale you use above: day/week/month/quarter).
- A visual breakdown of:
- available working time (effective calendars + individual availability),
- planned utilization (hours already allocated across projects),
- remaining capacity and overload signals.
- Tooltips provide a per-project breakdown of what’s consuming capacity in a given period.
How Team Managers use it
- Filter to the relevant people (by resource name, title, or team/RBS) to focus on the right sub-team.
- Select a request and enter assignment mode, then watch capacity update as you adjust allocations.
- Use overload warnings to decide whether to:
- re-balance allocations across team members,
- shift dates / reduce scope (send feedback to PM),
- or reject the request if it’s not feasible.
All capacity figures are calculated with 1‑minute precision using calendars, calendar override periods, and individual availability.
Table view (main area)
- Rows — One row per request. Columns include at least title, project, assigned team, status, priority, and summary data (e.g. requested/allocated hours, fulfillment %).
- Actions — Per row: same workflow buttons as in the timeline (Submit, Assign, Send for Review, Accept, Reject, Edit, Close, Cancel, History). Clicking a button (e.g. Assign or Edit) typically opens the review/edit modal.
Modals
- Create / Edit request — Used when a new request is created, or when a rejected/cancelled request is edited for resubmission.
- Submit — Select the team the request is being sent to (this determines which Team Managers can act on it).
- Review / confirmation modal — Used to confirm actions like Assign, Send for Review, and Accept. It shows the calculated summary (requested vs allocated hours, fulfillment %) and the proposed assignments.
- History — Shows an audit-friendly timeline of key events (created, submitted to team, and status changes), including who made the decision and when.
Request history (visibility and audit trail)
Each resource request includes a History action. Use it whenever you need to understand “how we got here” — especially in large portfolios where many people collaborate on staffing decisions.
The history view helps with overall visibility by showing a chronological log of key events, including:
- when the request was created
- when it was submitted to a team
- when and how its status changed (e.g. submitted → assigned → review → accepted)
For each event, the system records who performed the action and the exact time it happened.
How the resource request flow works (end to end)
This section describes the typical lifecycle and what each step is for.
1) Project Manager: create a new request (draft)
Start from New request. For a new request, you typically:
- Define the time window on the timeline (when the help is needed).
- Describe what you need (e.g. role/skill profile, scope/notes, priority).
- Review the request in the confirmation modal and save.
Interactive editor (timeline)
In the Timeline view, the interactive editor lets you shape the request on a time axis and (when used) define planned demand as capacity regions, so it’s easy to discuss timing with the supplying team.
Confirmation modal (what you can enter and review)
The confirmation modal is where you final-check and complete the request before progressing the workflow. Typical controls include:
- Request details (title, project, priority, and descriptive fields)
- Requested profile (what role/skills are being requested)
- Timeline summary (dates/periods and calculated totals)
- Related Jira tickets (optional) — in edit mode, you can attach Jira issues to better explain the request’s scope and context
The modal also shows a computed summary such as requested vs allocated hours and fulfillment percentage (depending on the request stage).
2) Project Manager: submit to a team
When the request is ready, click Submit:
- The Submit dialog opens.
- Select the target team you are submitting to (this decides which Team Managers can see and act on the request).
- Confirm. The request moves to submitted and appears for the responsible Team Managers.
3) Team Manager: review demand vs capacity and assign resources
Team Managers work from the same Requests tab:
- Use the Team capacity overview section to understand the team’s current and planned load.
- Select a request in submitted and enter assignment mode.
- Propose assignments by choosing team members and setting allocation percentages (partial allocations are supported).
Team capacity overview (why it matters)
The capacity view helps Team Managers balance competing project demands. Displayed capacities are calculated with 1‑minute precision using:
- working calendars (including exceptions)
- calendar override periods (effective calendars by date range)
- individual availability periods (including approved exceptions)
This is what makes the “remaining capacity” and overload warnings meaningful in real organizations.
Confirmation modal in assignment mode (what’s different)
In assignment mode, the confirmation modal focuses on staffing and feasibility:
- add/remove assigned resources
- adjust allocation percentages and timing
- review requested vs allocated hours and fulfillment
- spot overloads early using the capacity signals
When the staffing plan is ready, the Team Manager clicks Send for Review. The request moves to review for the Project Manager.
4) Project Manager: review and accept (save the staffing contract)
In review, the Project Manager checks the proposed assignments and either:
- Accepts — the request moves to accepted, and the assignment becomes the baseline for tracking plan vs actual, or
- Rejects — the request moves to rejected so it can be edited and resubmitted.
Create a Jira task from an accepted request
Once a request is accepted, the Project Manager can create a Jira task/issue for it (via the Task action). This helps day-to-day execution:
- the created task is automatically assigned to the appropriate Team Manager, and
- the assigned resources and other Team Managers are added as watchers,
so time reporting and follow-up happen on a concrete Jira item connected to the staffing decision.
Tracking actuals: submitted vs approved time, overtime, and the approvals dialog
After staffing is accepted, Timesheets → Project view uses accepted requests/assignments as the baseline (allocated hours), and Jira worklogs as actuals.
From Timesheets you can:
- toggle Submitted vs Approved hours (when approvals are enabled)
- see overtime (when overtime tracking is enabled)
- click a timesheet cell to open an approvals modal for the selected project × person × period, where authorized users can review and approve/reject individual worklogs
See: Timesheets, Worklogs
Request statuses and who can do what
Each request has a status. What you see and which buttons you get depend on your role for that request and the current status.
Why these states exist (overview)
- new: draft request being created by the Project Manager.
- submitted: demand has been handed off to a specific supplying team.
- resource_assigned: staffing has been proposed (resources/allocations are attached).
- review: Project Manager is reviewing the proposed staffing plan.
- accepted: staffing is confirmed; this is the “contract” used for baseline comparisons.
- closed: work completed (terminal).
- rejected: request was rejected (either not feasible or needs change); can be edited and resubmitted.
- edited: request is being modified after rejection/cancellation and is not yet resubmitted.
- cancelled: request was stopped (terminal).
| Status | What it means | Who can see it | Typical actions (by role) |
|---|---|---|---|
| new | Draft, not yet submitted | PM (own project), Admin | PM/Admin: Submit (choose team), Cancel |
| submitted | Sent to team for assignment | TM (assigned team), PM (own project), Admin | TM/Admin: Assign, Reject; PM/Admin: Cancel |
| resource_assigned | Team has assigned resource(s) | TM (assigned team), PM (own project), Admin | TM/Admin: Send for Review, Reject; PM/Admin: Cancel |
| review | PM is reviewing the assignment | TM (assigned team), PM (own project), Admin | PM/Admin: Accept, Reject; TM/Admin: Reject; PM/Admin: Cancel |
| accepted | Assignment confirmed | TM (assigned team), PM (own project), Admin | TM/Admin: Close; PM/Admin: Close, Cancel |
| closed | Work completed | TM (assigned team), PM (own project), Admin | (terminal — no further actions, but can be reinitiated by editing it again) |
| rejected | Request rejected by team | TM (assigned team), PM (own project), Admin | PM/Admin: Edit (then Submit), Cancel |
| edited | Request modified after rejection, not yet resubmitted | PM (own project), Admin | PM/Admin: Submit, Cancel |
| cancelled | Request cancelled | PM (own project), Admin | (terminal — no further actions, but can be reinitiated by editing it again) |
Visibility rules (who sees which requests):
- Admin: All requests.
- Team Manager: Only requests whose assigned team is one of the teams they manage.
- Project Manager: Only requests whose project is one of the projects they manage.
Action rules:
- Assign, Send for Review, Reject: Team Manager (for the assigned team) or Admin. Project Managers cannot do these unless they are also Team Manager for that team.
- Submit: Project Manager (for the request’s project) or Admin. Team Managers cannot submit (they receive requests).
- Accept, Close, Cancel: Project Manager (for the request’s project) or Admin. Team Managers cannot cancel; they can only reject.
- Edit (after rejection): Project Manager (for the request’s project) or Admin.
By default, closed and cancelled requests are hidden in the filter bar; you can show them with the “Hide: Closed” and “Hide: Cancelled” checkboxes.